Saturday, December 15, 2012

Butternut Squash Soup

Sorry about that! It's been busy, cold, and I've been avoiding meat which means I've cooked nothing interesting for two weeks. That changes today!


For Vegetable Stock
1 bunch carrots
2 large leeks
1 bunch celery
1 large onion
2 large shallots
5 cloves garlic
1/2 bunch parsley
6 sprigs thyme
2 bay leafs
4 whole cloves
8-10 whole peppercorns
8 cups cold water

For Soup
1 large butternut squash
1 onion
5 sprigs thyme
4 cups vegetable stock (divided)
Oil
whole nutmeg
2 whole cloves
1 teaspoon cardimon
Salt and pepper


Vegetable stock is far and away the easiest stock to make and customize. The trick is not to over cook it. 40 minutes isn't enough time for the vegetables to give all their flavors and combine, but 70 minutes will cook the vegetables too much and you will lose that bright fresh flavor. Shoot for 50 minutes to an hour. Other than that, go crazy.


Carrots, celery, and onion are a wonderful base for any veg stock, but you can add leeks, shallots, beet tops, random trimmings, really anything.


 As for seasoning, parsley, thyme, bay leafs, and peppercorns are the classics, but you can augment that with any number of spices and herbs. Rosemary and cloves usually end up in the pot for me. Another thing to keep in mind is that you want this stock to have a great flavor, but you also want it to be versatile. If you put turmeric or chipotle in there you are severely limiting the stock's application. The same can be said with garlic, so always err on the lighter side with it.

You are welcome to salt it at this point, which I recommend doing so, but if you want or need greater control over your salt intake you can always salt when you are making the actual meal.

Load everything into a the pot, cover with cold water. Set the heat to high and bring it to a boil, then reduce to a low simmer for 50 minutes. Once it's ready, remove from the heat and let cool for 20 minutes. To store pour into muffin tins and freeze. Each of mine holds about 1/2 a cup, which is a pretty convenient size. Once they are frozen store in a plastic bag for up to, lord I don't know, three months?


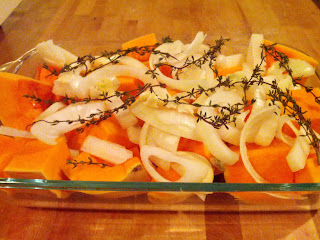
On to the soup! Now that we have all the hard stuff done, we can get to the easy bits. Preheat the oven to 350 then split the squash using a sharp knife and a steady hand. There really is no easy way to do it, but a sharp knife goes a long way. Once that's done, quarter the squash length wise, then chop into 1-2 inch segments.


At this point you could peel the skin off, but I prefer to give it 20 minutes in the oven, then it comes off a bit easier. Place the squash, the chopped onion, the thyme, and 1 cup of veg stock in a large roasting pan, drizzle some oil on top, let it roast for an hour to an hour and a half, turning the squash every 15 minutes until all sides are caramelized.


Next place the contents of the roasting pan into a large pot, removing the thyme stems. Add the remaining vegetable stock and cloves. Grate nutmeg into the soup to taste, I like about 1/2 tablespoon. Please use fresh nutmeg and grate it straight into the pot. If you used the pre-ground stuff or try to grate it ahead of time it looses most of its potency. Allow to simmer for an additional 20 minutes, blend using an immersion blender, then add salt to taste. Immersion blenders are like 15 bucks on Amazon, best purchase you've made all winter, believe, believe. Garnish with homemade croutons and thyme.


Thursday, November 29, 2012

Jack Rose

Hello Hello! I am very sorry I didn't post last week but I was busy being the worst person ever. I've decided to make it up to you all by posting a delicious, classic, boozy drink; the Jack Rose. A simple drink consisting of three, at the most four, ingredients, its from that wondrous pre-Sex in the City era where a man could drink a neon pink drink out of a martini glass and not get shit for it. 


2 oz Laird's Apple Jack 
1 oz home made grenadine (requires 2 large pomegranates, 2 cups sugar, 1/2 oz wine, citrus bitters)
1/2 oz lemon juice
1 dash Peychaud's Bitters

Lets start with the grenadine, which is a nightmare. After many hours of research and experimentation, I have determined pomegranates are just miserable. 


I tried paddling it, I tried picking the seeds out underwater, none of it is fun, all of it is terrible. The only advice I can give is wear and apron and don't drop it because then it looks like you murdered someone. 


Right, moving on. Seed both the pomegranates  add a half cup of water, put on the stove in a covered pot. Apply medium heat for 10 minutes, until the seeds are limp and give up their juices. 


These pomegranates are from the Davis Farmer's Market. One of them was filled with seeds so ripe they were almost black; the other had a much lighter color. The lighter seeds had a more tart taste, the darker much sweeter. I actually recommend getting a combination, if at all possible. Next pour the entire mixture into a blender and pulse in five second bursts until all the seeds appear popped. 

Now strain them back into the pot, being careful not to force the pits through the mesh. 


Add the sugar to form a simple syrup. Let cool, then add the vodka and bitters. Citrus is recommended, but I prefer dandelion bitters because citrus is boring some days. The vodka will help keep it fresh in the fridge for a few weeks. 


Now for the fun part! Combine all ingredients in a shaker over cubed ice, shake the dickens out of it for a solid thirty seconds, strain and serve in a martini glass. Enjoy with totally disregard to any prat who thinks Jack Roses aren't for men. Hemingway drank them, for God's sake. 


Thursday, November 15, 2012

Stir Fry

A vast majority of all stir fry ever made in a home kitchen have been terrible. That's a fact. That's just science. The culprit isn't your sauce, it isn't your veggies, it probably isn't even your technique. Odds are its that miserable stove of yours. My stove is more miserable than most. It is one of those god awful coil numbers that can't tickle a kettle in under 20 minutes. Disgraceful, I know. What happens when you try to stir fry without a crazy hot wok is you get steamed vegetables. Which is fine, but not what we are going for. What we want is that beautiful char with a crisp interior. With the assistance of some dear friends and the Internet, we found a solution. As with most of life's problems, our salvation was found in the humble grill.


2 bell peppers
4 baby bok choy
1/2 pound snap peas
2 Japanese eggplants
4 stalks of celery
2 large white onions
Shannon's Stir Fry Sauce (or appropriate substitute)

Chop everything into stir fry appropriate shapes. I like the celery in matchsticks, but an argument for just chopping it can be made. That's the easy part. Next you need to start a chimney of charcoal.


 I personally use lump mesquite coals, they burn considerably longer than briquettes but they are harder to pack into a chimney. Once the coals were completely white, we put the wok over the top, added some oil, tossed a bell pepper in there and waited for it to sizzle. And waited. And waited.


 Turns out, when you but the wok directly over the chimney, it suffocates the coals and doesn't heat up well at all. The solution? Our wok, like most home woks, comes with a stand so it can rest above the flames but still have a round bottom. We put this stand down first, then dumped the goals into it. Because we were working with lump coals nothing fell through, but if you are using briquettes just remove the top grill. This allowed us to put the wok directly on the coals, like damned fools, but goddammit it was hot. Sizzle hot. Red hot actually, but that's not the point. 


Once you get the pan crazy hot, work in small, quick batches. toss everything with a bit of oil and keep the ingredients moving. The higher up the sides the cooler the wok is, so if you see something getting too cooked move it up to the sides. 


Once we had all the veggies cooked, we put them back in the wok, tossed all the sauce on it, then let it cook for about 30 seconds, and took it inside. Served it over rice. It was hands down the best at home stir fry any of us had tasted. 


Thursday, November 1, 2012

Couscous with Asparagus and Artichoke

I've got some pretty weird news today. As some of you know, I've been going through a lot of big changes lately, what with the new job and Shannon moving out. During times of change I like to reflect; see where I'm at and where I want to go next. I was shocked, SHOCKED, to discover that I should probably not eat nearly as much meat as I do now. I know, I know, this sounds like something I would never say but it looks like the right play. A few months ago I stumbled upon this article about Mark Bittman's Vegan Before 6 book thing. I skimmed the article and filed it away, but something about it really stuck with me. It seemed simple and still allowed for me to eat all the weird and fun stuff I hold dear. This has made a noticeable change on my health and appearance. I lost about 15 pounds (granted I exercise more now) and occasionally don't eat meat for a week without trying. That's a bit of a round about way of saying I don't really eat meat or dairy unless I'm out anymore, so expect to see a lot more vegetarian/vegan recipes. Once a quarter or so I will make it a point to find some offal or other weird bit to cook up, no worries. I cannot emphasize enough how not serious I am taking this. I will still probably eat meat when I go to dinners, and I'm not going to get up in your shit if you server me a soup that was made with chicken broth. This has nothing to do with religion, or morals, or anything else besides I have a shot at living past thirty and, however unlikely that is, in the event that it does happen I would like to enjoy those years. Now that we got all that noise out of the way, lets cook yeah?


1 cup pearled couscous (sometimes called Israeli couscous)
1 1/2 cup water
2 artichokes (or 1/2 cup of marinated artichoke hearts, whatever)
1 bunch asparagus
1 cup grape tomatoes
1/2 cup olives
1/2 bunch parsley
salt 
pepper


The longest thing to cook is the artichokes, so if you want to substitute canned hearts, its a big time saver. If you are like me and enjoy artichokes steamed and then eaten with some melted butter or pesto, they make a great appetizer and you can throw the hearts into the main dish after your guests have picked them clean. Add an inch of water to the bottom of a large pot. Toss in a bay leaf and a garlic clove, add your steamer (or in my case some ramekins) then bring to a boil. Rinse the artichokes well while the water is working. Reduce heat until the water is simmering, then add the artichokes. They will take between 45-60 minutes, but besides checking the water and turning them every 15 minutes they really do take care of themselves. 


While those are covered and steaming, rinse and trim the asparagus, then arrange on a baking sheet. Salt them liberally and dizzle with oil. Pre-heat the oven to 350, then let the asparagus roast for 15-20 minutes, turning them every 5 minutes. I like mine to get nice and crunchy, but if you just want them to get bright green that is fine too. 


I'd recommend following the instructions on the back of the couscous, but if you are like me and prefer to keep it in a pretty jar, you probably threw the instructions away and are desperately trying to remember them. For one cup of couscous, bring one and a half cups of lightly salted water to a boil, then add the couscous. Reduce the heat to medium low and allow to cook for 8 minutes, stirring once. All the liquid should be absorbed by then, but be sure to fluff with a fork to let the trapped steam out. 

Next chop the asparagus into 1 1/2 inch segments, half the tomatoes, and loosely chop the olives, artichoke hearts, and parsley. Throw it all together, drizzle with some oil, and call it a night!


Thursday, October 25, 2012

Soyrizo Hamburgers: A Cautionary Tale

Listen, I know how it is, I really do. I've been there. Pop down to the local gastro-pub, grab a quick chorizo burger, decide "Hey! I can soy this bitch up at home and feel a bit less awful about meself tomorrow!", but it never really works that way, does it? In the sordid history of this site there have been two failures for each post, approximately. It happens to be that I am having my first field trip in my new job to the exotic land of Modesto tomorrow, so I haven't time to whip up something that worked for you all. In lue of something worth posting, I'm posting this mess! Ta-da! You can ask anyone who spoke to me for any length of time this week, I was very much looking forward to this. I'm completely devastated that this came out just terrible, so I'm going to share what I was going for, what went wrong, and what I would do if I had the time to do it right.


12 oz Soyrizo (Soy based Mexican chorizo substitute)
16 oz ground beef
6 potato buns
2 Avocados
2 Serrano peppers
1/2 bunch cilantro
2 tomatoes
2 green onions
1/2 teaspoon ground cumin
salt
pepper
I combined the soyrizo and the ground beef, then formed into patties and let sit. I would decrease the amount of soyrizo by about half.


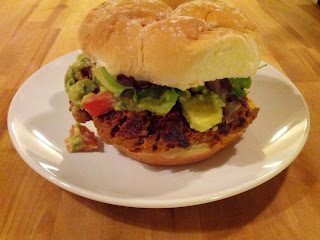
 While the patties were resting I made the guacamole to top the burgers with. Guacamole is a simple and delicious thing, just chop up everything else that's left, toss it in a bowl, add some cumin, salt and pepper.


 My mistake was that I didn't but cilantro at the market today, so my guacamole tasted awful.


Next I made the first batch in my  stainless still skillet which of course was just a terrible idea. This is one of the reasons that I make way more than I can ever eat and why Mint.Com keeps telling me I spend too much on food. I switched to a non-stick pan and medium high heat, which created a crumbly awful burger, no good.


 Next I dropped the heat down substantially and got something that looked vaguely like a burger, but again because I screwed up in the beef mixture, there was no saving these. At least I would have something worth photographing though, if it held together, which it didn't. My last try was high heat to start, sear both sides, then move to low to cook through. What I ended up with was a very tasty sloppy joe. If I had to do it all over again, I wouldn't use soyrizo because it doesn't crisp up or hold its shape like proper chorizo, and I would do a less aggressive 1 part chorizo to 3 parts beef. The guacamole would have cilantro and there would probably be cheese on the burger like God intended. Normal operation should resume next week, sorry if you were hoping to find something edible here.

Thursday, October 18, 2012

Scofflaw

Hello Hello! I am feeling PARTICULARLY lazy tonight, so strap in kiddos, I've got a fun one. It's called a Scofflaw, after the Frenchmen who would drink it during the American Prohibition (I spit on its name), and its delicious.

(I'm posting without photos, i'll get them from Joe tomorrow. I'M SORRY!)

1 1/2 ounces rye whiskey
1 ounce white vermouth (French, not dry. There is a difference)
3/4 ounce grenadine (make it yourself, its super easy)
3/4 ounce lemon juice (if you aren't squeezing it yourself you aren't the person I thought you were and we can't be friends anymore)
Right lets start at the top. If you are new to whiskey, just get Crown Royal for this recipe. If you like whiskey but aren't too keen on the specifics, I'd highly recommend Redemption Rye or Bulleit Rye.  If you are into Whiskey and up on specifics, do as you damn well please. As for vermouth, I like Dolin Vermouth Blanc. In the States mostly what you will find is sweet or dry vermouth. Both have their places (negroni's and martini's, respectively), but are to be keenly disassociated from white vermouth. Its worth tracking down, try BevMo. Next up is grenadine. Do us a favor, go to your cupboard, grab that neon red bottle of Roses and just throw it away. We do this shit LIVE! Surprise double recipe WHAAAT?
2 cups pomegranate juice (I use plain Pom because its available, use the best available)
2 cups sugar
Go ahead and put those two in a small sauce pan on the stove, bring to a slow simmer, let that work for ten minutes. Let cool, bottle with a jigger of vodka or gin and you've got yourself a grenadine.
Next grab your favorite cocktail shaker, add ice and all the ingredients, then shake for a good 30 seconds. Strain and serve over ice in a cocktail glass.

Just an FYI, this post has not been proof red. DEAL WITH IT. 

Thursday, October 11, 2012

Parsley Salad

As you may have noticed, there is a distinct lack of sweet things on this site. I really wish that weren't so, but I honestly harbor no love for such things. One thing I am quiet fond of, however, is parsley. Its not as bright as basil, its much meaner than sage, and not as versatile as rosemary, but that's okay. Parsley is this bitter baseline, this constant companion, always there to fix a dish feels not quite right. Every so often I like to take some time and appreciate parsley not as a seasoning or companion to another ingredient, but as the center of a dish. This isn't for everyone, as most things are, but if you have any affinity for parsley this is about as parsley as it gets before you become that weird guy in class just eating the stuff straight. Wierdo.

1 punch parsley
3 European shallots (or 1 american)
1 small red pepper (or a half teaspoonful of pepper flakes)
2 tablespoons of capers
1 tablespoon lemon juice
Olive oil (I don't know why I specify olive anymore, but I'm going to stop. This is your last warning, from here on out, unless I specify, when I say "oil"  I mean "freshest extra virgin olive oil you can reasonably afford")
Sea salt
Pepper

Roughly chop the parsley, pepper, and shallots, mix in a bowl with all the other ingredients, adding oil until the desired texture is reached. Serve over toasted bread. That's it, and its delicious and simple and yes I know this is super short and a cop-out but shut up I'm getting drinks in Sacramento with an old friend tonight at the Pour House and I want to get this done so I can go.

Thursday, October 4, 2012

Ravioli over Steamed Spinach

For Shannon's birthday we went to Tucos in downtown Davis for lunch. I had some delicious ravioli and decided to shamelessly rip them off for a quick, easy post while simultaneously clearing out my fridge.


1 batch fresh pasta (see this post)
1 cup ricotta cheese
1 bunch spinach
1 whole egg
1 tablespoon lemon juice
Pasta Sauce (dealer's choice, I did tomatoes, shallots, sage, rosemary, oregano, and thyme.)
hard cheese for garnish
salt and pepper

This is going to be a technique heavy post and is really only relevant to people who have a pasta roller. If you've got any sense at all, you should probably be/become one of those people. Like now. We all set? Good.


Picking up where I left off in the first pasta post, you should have a chilled ball of dough. Cut that in half, then form the pieces. What we need to do is form it until it is squarish in shape and about 1/3 inch thick. Anything thicker won't fit into the machine.


Doesn't have to be perfect, heck it doesn't even have to be pretty. Make sure you use plenty of flour while forming it and take that disgusting fork out of frame before you start taking pictures. Gross. Run it through the machine at the biggest setting.


After you run it through the machine you will have a slightly thinner mess. Fold it over like a letter into thirds, then run through the machine again and again, lowering the size each time, until you reach the desired thickness, which is usually as thin as you can get it.


In my experience, you need three hands to work one of these things. The first hand should feed the pasta into the top, the second should turn the crank, and the third should guide the pasta out the bottom, watching carefully for snags. What happens is as the pasta gets thinner and thinner the flower gets more and more incorporated into the dough, which is good, and the dough appears to be more wet, which is bad. You need to flower the dough after every pass, or else the wet bits will get stuck on the metal rollers and its just a mess. Work slow, keep a ton of flower on hand, and watch for snags. Eventually you will get to the point where its so thin that no matter what you do it will catch. That is the point at which you should stop.


I usually end up with two completely different pieces of pasta, but that's fine. Cut them into sections you can manage, like so. I prefer to use my bench scrape for pasta cutting because it feels pretty awesome, but you can use a knife or a pizza cutter.


In a bowl mix the ricotta with the egg, lemon juice, salt and pepper. You can add pepper flakes here if you like or lemon zest or pretty much anything else.


Scope the filling with a teaspoon and add dollops just off-center to the pasta, spacing them about an inch apart.


Fold the pasta over the filling and press down. Starting from the folded side and working to the open edge, press down HARD on the space between the filling lumps. You want to get all the air out of the pasta so leave the front edge for last.


Most people use an egg wash to hold the pasta sheets together, but I've always just pressed the edges really really hard and it holds plenty fine. If you were using a less fresh or wet dough then maybe it would be helpful, but I really don't know.


Boil the pasta on a very low boil until the pasta floats, and even then give it another minute or so. Work in small batches.


While the pasta is working, in a pan steam the spinach until wilted and delicious. I recently lost a roommate, but gained a best friend, but also lost a handy vegetable steamer. What's a fellow to do, you might ask? This.


I put the spinach in a ramekin in a small amount of water and steamed with the lid closed. Worked pretty well, all things considered. Arrange the spinach on a plate, top with pasta and sauce, then serve!


Friday, September 28, 2012

Larousse Gastronomique

I had to share this from the Beef section of Larousse. Look at those illustrations! Just brilliant.


Caramelized Onions

There are very few things that do not benefit from caramelized onions, almost all of which should not be eaten. The biggest roadblock to having delicious gooey onions is how long it takes to do it right. The best compromise I've found is to make a massive batch at once. It takes about the same amount of time to cook 1 onion as it does to cook 10. Because this is a pretty straight forward recipe, I thought I'd also share some of my favorite kitchen tools.

Onions
butter
salt
sugar

I have a terrible habit of excluding onions from my shopping list. I just always assume I have some. This works for me most of the time, but on the occasion I will go to the market and just stare at the bags of onions, wondering if I have one or six or no onions left at home. They are cheap, so I almost always grab a bag. Then I come home, realize i bought a bag last week, and try to figure out just what the hell to do with all these damn things. Caramelized onions, that's what we do. 


I've seen dozens of recipes floating around the Internet for quick, easy, tasty caramelized onions and that's fine but that's not what we are making here. When I want an ultra-traditional and completely impractical recipe, there is only one place I look to for guidance. Larousse Gastronomique. 


This is a direct quote from the 1961 English edition, which was a direct translation from the 1938 French edition, "Glazed onions. Heat some butter in a shallow pan and put in the onions. Season with salt and a pinch of caster (fine) sugar. Cook, covered, on a moderate heat, in such a way as to allow the onions to cook and acquire their colour at the same time". That's pretty vague, but we have enough information to work with and some interesting points. I've seen several sites say that using sugar is "cheating". Those sites are clearly wrong. 


Cut the ends from the onions, then split in half and peel. I probably lost a fair amount of people right there. Personally, I hated cutting onions before I moved in with Miss Bailey. Awful, nasty, things used to make me cry like crazy. Miss Bailey, God bless her, introduce me to the two greatest onion chopping tools.


If you wear those dorky goggles shamelessly from start to finish, I guarantee you wont end up a sobbing mess. The second tool is a bench scraper. Its fantastic for clearing off cutting boards or moving cut onions from the table to the pan. I used to use my knife to do this, but the bench scrape has a much bigger surface and I don't care if it gets dull. 


I find the easiest way to peel a large amount of onions is to cut the ends, then split the onion, then peel. If you peel before splitting its not a fun time. Once they are peeled, I cut them into semi-circles.


Next head a nob of butter over medium heat and add the onions. Season with salt and sugar (two pinches of salt, one of sugar) and wait.


This is the onions after an hour on the stove covered, stirring every ten minutes.


They certainly are broken down, but they don't have that delicious brown color that we are shooting for. At this point I removed the cover, cooked for ten additional minutes, and got this.


Which is pretty much exactly what we were shooting for. You could probably uncover somewhere at the 30 minute mark and have similar results. These are great in, on, and around pretty much all food. Go crazy man, seriously.